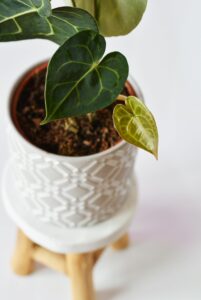
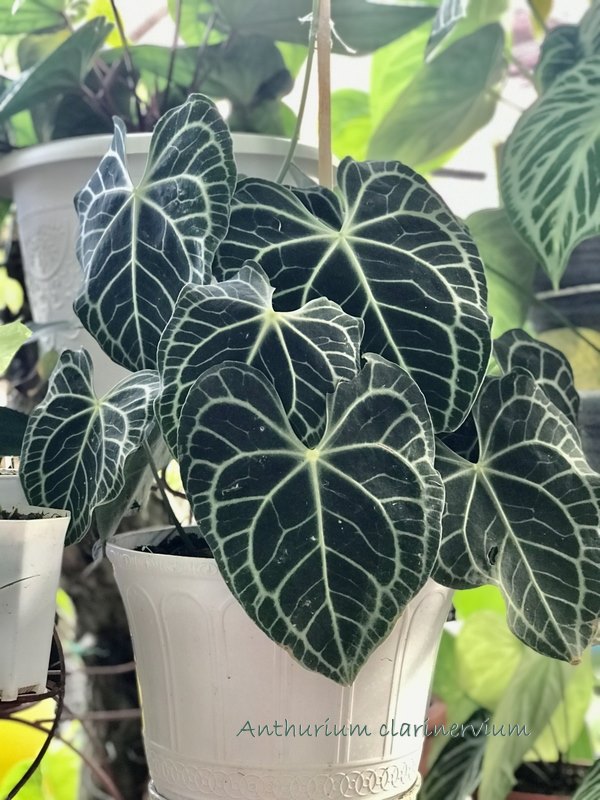
Anthurium clarinervium, commonly known as the Velvet Cardboard Anthurium, is a captivating houseplant that has gained immense popularity among plant enthusiasts. Known for its striking foliage and unique texture, this tropical plant is a perfect addition to any indoor garden.
Anthurium clarinervium hails from the lush tropical rainforests of southern Mexico. It belongs to the Araceae family, which is known for its wide variety of decorative plants. In its natural habitat, this plant thrives under the canopy of trees, enjoying the high humidity and dappled sunlight of the forest floor.
The most striking feature of Anthurium clarinervium is its heart-shaped leaves. These leaves are velvety to the touch, with a deep green hue contrasted by prominent white veins that create a striking pattern. Each leaf can grow up to 8-10 inches long, making it a focal point in any plant collection. The plant also produces small, inconspicuous flowers on a spadix, typical of the Araceae family, but these are often overshadowed by its dramatic foliage.
Scientific Classification
| Kingdom: | Plantae |
| Clade: | Tracheophytes |
| Clade: | Angiosperms |
| Clade: | Monocots |
| Order: | Alismatales |
| Family: | Araceae |
| Genus: | Anthurium |
| Species: |
A. clarinervium
|
| Binomial name | |
|---|---|
| Anthurium clarinervium | |

Care
Anthurium clarinervium, also known as the Velvet Cardboard Anthurium, is a stunning houseplant admired for its unique foliage. To ensure this plant thrives indoors, it’s important to understand and meet its specific care requirements. Here’s a detailed guide on how to care for your Anthurium clarinervium indoors.
Light Requirements
Anthurium clarinervium prefers bright, indirect light. Direct sunlight can be too harsh and may cause the leaves to scorch, leading to brown, crispy edges. Ideally, place the plant near an east or north-facing window where it can receive filtered sunlight. If natural light is insufficient, consider using a grow light to provide the necessary illumination.
Watering
Maintaining proper moisture levels is crucial for the health of your Anthurium clarinervium. The plant prefers consistently moist soil but is sensitive to overwatering, which can cause root rot. Follow these watering guidelines:
- Frequency: When the top inch of soil appears dry to the touch, add water. This usually translates to watering every 1-2 weeks, depending on your indoor environment.
- Method: Water the pot thoroughly until the water drains from the bottom. Ensure that the pot includes drainage holes to keep water from gathering at the bottom.
- Humidity: Anthurium clarinervium thrives in high humidity. Aim for humidity levels around 60–80%. To increase humidity, either use a humidifier or place a tray of water with pebbles near the plant.
Soil and potting
The right soil mix is essential for good drainage and aeration. Use a well-draining potting mix, such as an orchid mix, or create your own mix using equal parts peat moss, perlite, and orchid bark. Repot the plant every 1-2 years to refresh the soil and provide more space for root growth.
Temperature
Anthurium clarinervium prefers a warm environment. Maintain indoor temperatures between 65 and 80 °F (18 and 27 °C). Avoid exposing the plant to temperatures below 60°F (15°C) and protect it from drafts or sudden temperature changes.
Fertilizing
Feed your Anthurium clarinervium with a balanced, water-soluble fertilizer diluted to half strength. Fertilize every 6–8 weeks during the growing season (spring and summer). Reduce feeding during the fall and winter, when the plant’s development slows.
Pruning and maintenance
Regular pruning helps maintain the plant’s shape and health. Remove any yellowing or dead leaves to encourage new growth and prevent disease. Wipe the leaves with a damp cloth occasionally to remove dust and keep the plant looking vibrant.
Propagation
Propagating Anthurium clarinervium is typically done through division.
- Carefully take the plant out of its pot and carefully separate the roots.
- Divide the plant into smaller sections, ensuring each section has a healthy root system and at least one leaf.
Plant each portion in a separate pot filled with fresh potting mix and thoroughly water it.
Anthurium clarinervium is a beautiful and unique houseplant that can thrive indoors with the right care. By providing the appropriate light, water, humidity, and maintenance, you can enjoy its striking foliage and add a touch of tropical elegance to your home. With attention to its specific needs, this plant can become a cherished centerpiece in your indoor garden.
Common Pests & Problem
Despite its hardiness, Anthurium clarinervium can occasionally face pest infestations and other problems. Identifying and addressing these issues early can help keep your plant healthy and thriving. Here are some common pests and problems you might encounter with Anthurium clarinervium, along with solutions for each.
Common Pests
Spider Mites
Symptoms: fine webbing on the undersides of leaves; tiny specks moving on the leaves; yellowing or stippling of leaves.
Solution: Increase humidity around the plant since spider mites thrive in dry conditions. Spray the plant with a mixture of water and mild soap, or use neem oil. Ensure thorough coverage, especially on the undersides of the leaves. Repeat the treatment every 7–10 days until the infestation is under control.
Mealybugs
- Symptoms: white, cotton-like masses on leaves, stems, and in leaf axils; honeydew (a sticky substance) on leaves.
- Solution: Wipe affected areas with a cotton swab dipped in rubbing alcohol to remove mealybugs. For larger infestations, apply insecticidal soap or neem oil. Regularly inspect the plant and treat it as necessary.
Aphids
- Symptoms: clusters of small, soft-bodied insects on new growth; sticky honeydew on leaves; distorted or curling leaves.
- Solution: Spray the plant with a strong stream of water to dislodge aphids. Apply insecticide soap or neem oil to the afflicted areas. Introduce beneficial insects, such as ladybugs, to decrease aphid populations.
Scale Insects
- Symptoms: brown or tan; shell-like bumps on stems and leaves; yellowing leaves; sticky honeydew.
- Solution: Remove scale insects manually with a cotton swab dipped in rubbing alcohol. Apply horticultural oil or insecticidal soap. Regularly monitor the plant and treat any new infestations promptly.
Common Problems
Yellowing Leaves
- Cause: overwatering, underwatering, nutrient deficiency, or low light conditions.
- Solution: Check soil moisture levels and adjust watering practices accordingly. Ensure the plant is receiving adequate, but not excessive, light. Feed with a balanced fertilizer if a nutrient deficiency is suspected.
Brown leaf tips or edges
- Cause: low humidity, underwatering, excessive fertilization, or salt buildup in the soil.
- Solution: Increase humidity around the plant using a humidifier or a pebble tray. Water consistently, and avoid letting the soil dry out completely. Flush the soil periodically to remove excess salts and avoid over-fertilizing.
Root Rot
- Cause: overwatering or poor drainage.
- Solution: Let the soil dry completely in between applications of water. Ensure the pot has drainage holes, and use a well-draining potting mix. If root rot is severe, trim away the affected roots and repot the plant in fresh soil.
Leaf spot diseases
- Cause: Fungal or bacterial infections, often due to high humidity and poor air circulation.
- Solution: Remove the afflicted leaves and promote air circulation around the plant. Avoid overhead irrigation, and keep the leaves dry. Apply a fungicide if necessary to control the spread of the disease.
Wilting
- Cause: underwatering, overwatering, root rot, or extreme temperatures.
- Solution: Check soil moisture levels and adjust watering practices. Inspect the roots for signs of rot and repot if necessary. Protect the plant against severe temperatures and unexpected fluctuations.
Preventive Measures
- Regular Inspection: Regularly check your plant for early signs of pests and problems. Effective therapy depends on early discovery.
- Proper Watering: Water appropriately, ensuring the soil remains moist but not soggy. In between waterings, allow the top inch of soil to become dry.
- Humidity and Air Circulation: Maintain high humidity levels and ensure good air circulation around the plant to prevent fungal and bacterial diseases.
- Clean Environment: Keep the plant’s environment clean. Get rid of any dead or decaying plant matter right away.
By understanding the common pests and problems that can affect Anthurium clarinervium and implementing these preventive measures, you can ensure your plant remains healthy and continues to thrive indoors.


Your point of view caught my eye and was very interesting. Thanks. I have a question for you.
Thank you for your sharing. I am worried that I lack creative ideas. It is your article that makes me full of hope. Thank you. But, I have a question, can you help me?
I don’t think the title of your article matches the content lol. Just kidding, mainly because I had some doubts after reading the article.
I don’t think the title of your article matches the content lol. Just kidding, mainly because I had some doubts after reading the article. https://www.binance.com/en-ZA/register?ref=JHQQKNKN
I don’t think the title of your article matches the content lol. Just kidding, mainly because I had some doubts after reading the article.